Summary: This tutorial shows you step by step how to install Oracle Database 12c in Windows 10.
Installing Oracle Database
To install the Oracle database on your computer, you need to download the installer from the download page of the Oracle website.
After having the installation files in ZIP format, you need to extract them into a specific folder on your computer.
The following picture shows the structure of the folder of the Oracle installation files after extraction.

Now you need to double-click the setup.exe file to start the installation process. There will be 9 steps that mostly automatically execute.
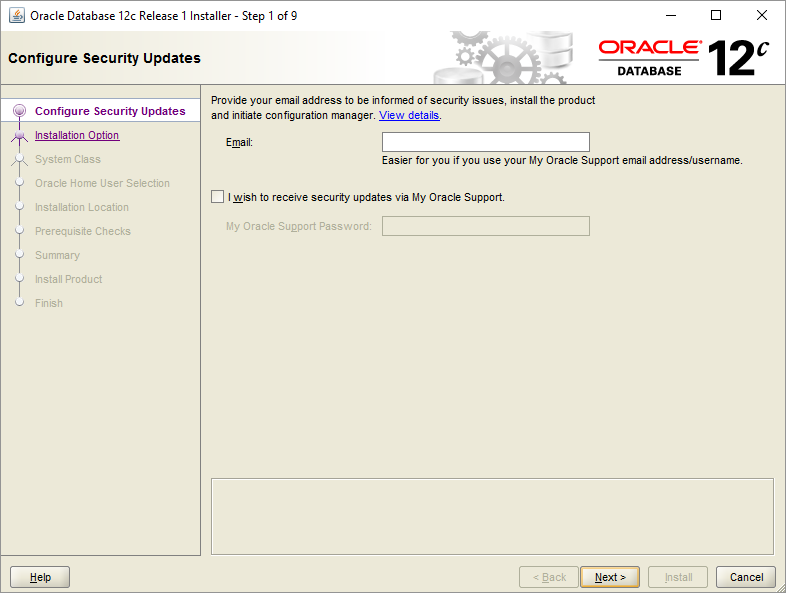
Step 1. The installer asks you to provide your email address to get the latest security issues and updates. You can ignore it by clicking the Next button:

Because I didn’t provide the email address, the Oracle database installer confirmed it, you just need to click the No button to continue.

Step 2. In step 2, the Oracle installer asks you whether you want to create and configure a database, install database software only, or just upgrade an existing database. Because you install the Oracle database for the first time, choose option 1 and click the Next button.

Step 3. The installer allows you to choose the system class. Because you install Oracle on your computer, not a server, therefore, you choose the first option: desktop class and click the Next button.

Step 4. This step allows you to specify the Windows user account to install and configure Oracle Home for enhanced security. Choose the third option: “Use Windows Built-in Account”.

Step 5. In this step you can (1) choose the folder on which Oracle database will be installed, (2) Global database name and password, (3) pluggable database name.

Step 6. The installer performs the prerequisite check.

Step 7. The installer shows you the summary of the information such as global settings, database information, etc. You need to review the information and click the install button if everything is fine.

Step 8. The installer starts installing the Oracle database. It will take a few minutes to complete, depending on your computer.


You will see the Database Configuration Assistant window. Click the Password management… button to enter the password for Oracle database accounts.

Enter the password for SYS and SYSTEM accounts and then click the OK button.

Step 9. Once installation completes successfully, the installer will inform you as shown in the following screenshot. Click the Close button to close the window.

Connecting to Oracle Database
First, launch the SQL developer application provided by the Oracle Database.
Second, right-click the connections node and choose New Connection … menu item to create a new connection.

Third, enter the information that you provided during the installation process as shown in the following screenshot. Click the Connect button to connect to the Oracle Database.

SQL Developer will display all objects as shown below.

Congratulation! you have installed Oracle Database 12c successfully. Let’s start exploring Oracle.
Adding an entry to the tnsnames.ora file
The tnsnames.ora file is typically located in the following directory:
C:\app\<user>\product\12.1.0\dbhome_1\network\admin\Code language: SQL (Structured Query Language) (sql)If you follow the above installation steps, then the file is located in the following directory:
C:\app\product\12.1.0\dbhome_1\network\admin\Code language: SQL (Structured Query Language) (sql)You first open the tnsnames.ora file using any text editor such as Notepad or Notepad++. Then, you need to add the following lines at the end of the file:
PDBORCL =
  (DESCRIPTION =
    (ADDRESS = (PROTOCOL = TCP)(HOST = localhost)(PORT = 1521))
    (CONNECT_DATA =
      (SERVER = DEDICATED)
      (SERVICE_NAME = pdborcl)
    )
  )Code language: SQL (Structured Query Language) (sql)
After that, you can save the file and close it. It is time to download and load a sample database into the Oracle Database server.